Pyramids Variations - Lesson Three
Adding the Melody
Chords in a chord sequence on their own aren’t enough to make a piece of music, or a song. We expect to hear a tune, or melody, as well, and in this lesson we add melody notes to the Basic Music-making Position (BMP) notes of the Pyramids chord sequence.
There is only one new note in each bar – and all the notes from the previous versions are still there. The new melody note is in the most important position – the highest note, right at the start of the bar – so it is played at the same time as the lowest BMP note (LH5).
Here is the lesson performance.
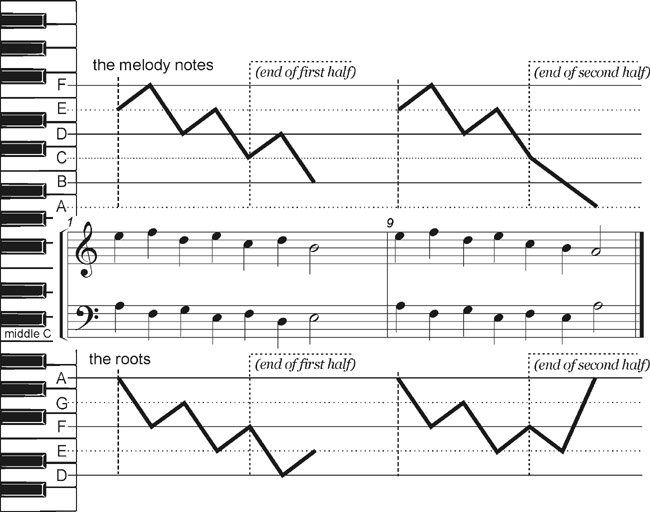
Here is a sketch of the music so you can see what all this means. The circles are the new melody notes; the rising slashes are the groups of six BMP chord tones.
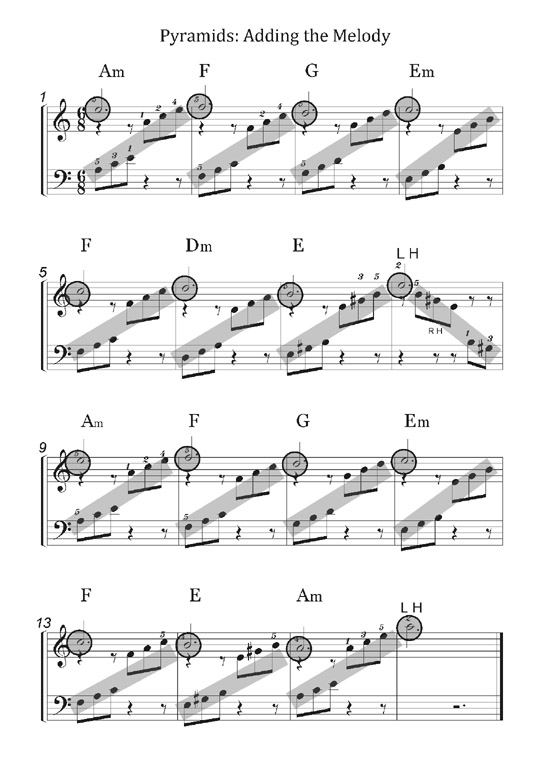
This ‘sketch’ music isn’t here to be played, but to use to form an overall picture of the music in your mind’s eye.
Check off the following five points against the sketch music:
- There is only one new note in each bar (circled).
- This new melody note is in the most important position – at the top, right at the start of the bar.
- The new melody is played at the same time as the lowest BMP note – the left hand little finger note (LH5).
- The new melody note is always a BMP chord tone.
- All the notes from the Pyramids with Left-hand-over Patterns are still there, but the Introduction has been dropped.
The numbered points above illustrate song-writing technique in general.
If chords come to you first when you’re 'just messing about at the keyboard' promoting your top chord tones to melody status is an obvious but invaluable song-writing/melody-writing technique.
If tunes come to you first, this is still true. Your melody note – especially on strong beats like the first beat of the bar – will usually be the highest note of the supporting chord.
Learn the melody
Learn the melody using any of the available means.
(section videos)
The melody notes added to a chord chart
Here are the new melody notes written into a chord chart above the chord symbols you already know.
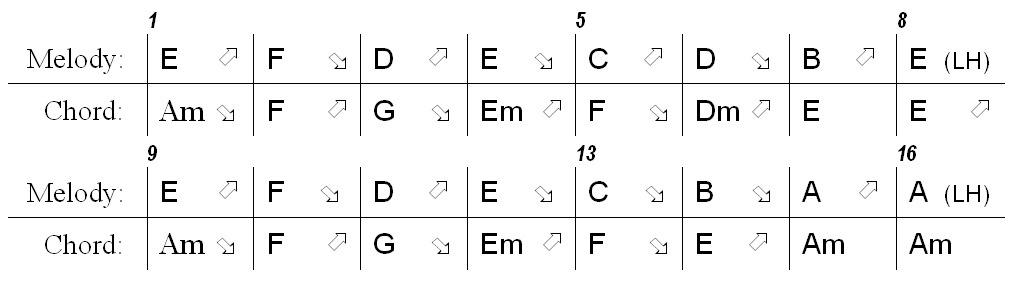
- Both hands still play the six rising BMP notes indicated by the chord symbols in the ‘Chord’ rows.
- The right hand plays the single notes in the ‘Melody’ rows in the chart, except in bars 8 and 16, where the LH-over note has been promoted to the melody.
The arrows in the chord chart show how the melody and the chord roots move either up or down when the chord changes. Notice that the melody and chord roots usually move in opposite directions. You will see this more clearly in the diagrams that follow.
Still without trying to play the music, look at the music
sketch again to see how both the music sketch and the chord chart show the same
thing in different ways. Here the sketch music again.
Learning the new version
The next diagram shows the new melody notes and the chord roots for the whole version, all squeezed into one line of music. (The LH-over notes are not shown.)
Learn these two zigzag lines of notes – there is a keyboard picture further on if you cannot read music. Use your index (pointing) fingers for all the notes, so that your hand moves from side to side, following the zigzag shape.
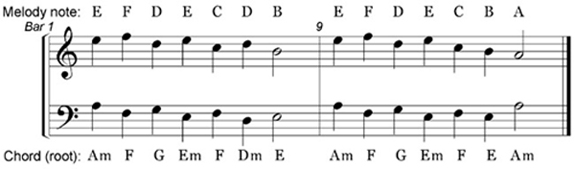
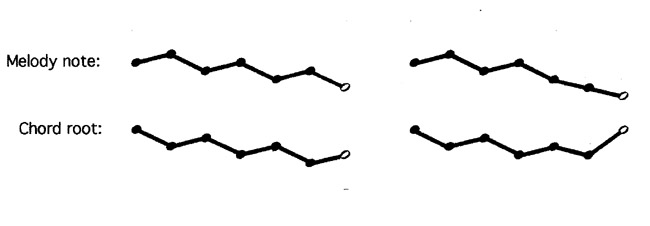
If we join the notes up and take away all the other lines, we can see the ‘shape’ of the music very clearly, and also how the two lines mainly move in opposite directions.
Try to play the little study above by looking just at this diagram instead of the music. Your starting notes are E in the right hand, and A in the left.
(section video)
Now let’s look at all we know about this new version in one diagram.
You see the written music of the new melody notes and the chord roots at the centre of the diagram, the zigzag lines of the new melody notes (above) and the chord roots (below) and where to find the notes on the keyboard.
Try to copy the lesson performance files and play the
melody-added version from the instructions so far.
Fingering the new right hand
When we add the melody notes to the BMP notes, we find that it’s better to play the right hand BMP notes with fingers 1, 2 and 4 so that we have the right hand little finger free to play the new melody note at the start of the next bar.
Here is a sample of what the right hand actually plays in this ‘melody-added’ version, with the new fingering given.

The first note in each bar is the new melody note. The other three notes in the bar are the right-hand BMP chord indicated by the chord symbols Am, F and so on.
If you play your right hand BMP chord with fingers 1, 2, 4, your little finger (RH5) is always over the next melody note, except in LH-over patterns and bars 13 and 14.
(section video)
Building up to your performance
Use the performance files and build up to your Pyramids: Adding the Melody' performance as follows.
- Play the Lesson Two ‘Pyramids with LH-over Patterns’ version a few times.
- Remind yourself of the zigzag shape of the melody and the chord roots using the one-line study and the diagrams in this lesson.
- Add the new melody notes to the Lesson Two performance. You play these new melody notes with RH5 (the right-hand little finger) at the same time as LH5 (the left-hand little finger) starts playing the six BMP notes.
Try to play the new version without the music, using the performance files and the various diagrams in this module. Here is the chord chart with the melody notes added again, just as a reminder.
(section video)
Here are the performance videos - the performance MIDI played on MidiPiano and the scrolling manuscript.
Watch it on MisterMusicarta YouTube
Lead sheets
Popular musicians often play music where only the melody and some chord symbols are given. Music like this is called a ‘lead sheet’ (pronounced ‘leed’) because it shows what the lead instrument is playing – the melody.
A lead sheet version of ‘Pyramids: Adding the melody’ might look like this.
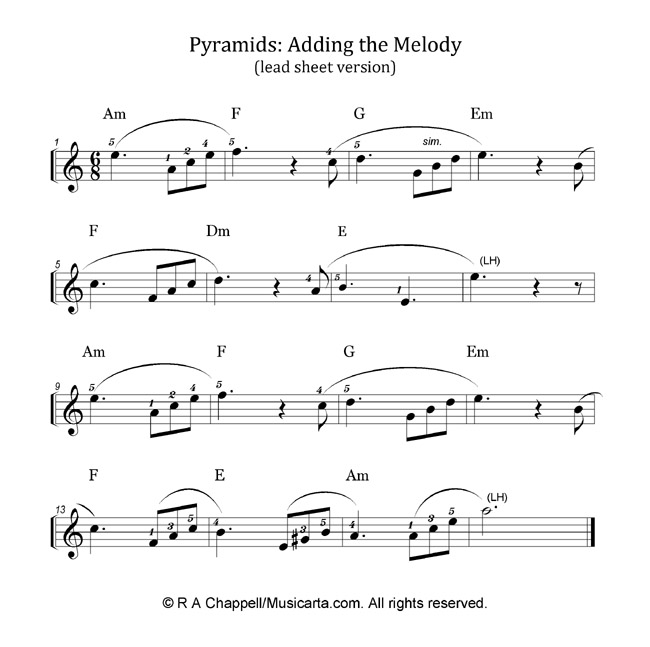
You see straight away that there is no piano accompaniment. There isn’t even a stave (set of lines) for the left hand.
The only clue to the accompaniment is the chord symbols. If you know the Basic Music-making Position, you will be able to find chord tones which go with the melody.
Next, there is the time signature, which tells you what rhythm your accompaniment must fit into. The time signature is six-eight, counted:
“ONE–and–a TWO–and–a ONE–and–a TWO–and–a…”
There are six BMP notes, so playing them all will fill the bar.
Try playing the ‘Adding the Melody’ version from the lead sheet, making the melody notes shown in the lead sheet stand out.
(There's a video about 'bringing out the melody' at the bottom of the page.
The melody in the written music
Once you add a melody, the Basic Music-making Position chord tones are not so important. They become ‘the accompaniment’. The melody is now the important thing, and we help the listener appreciate it by making it a little louder than the accompaniment. This is called ‘bringing out the melody’.
In the full written-out music for ‘Pyramids: Adding the melody’, you can see that some notes have stems going both up and down. These are BMP notes that have been ‘promoted’ into the melody. But all the right hand BMP notes – promoted or not – still have their own down stems, to remind you where they come from.
Here are the first four bars of the full ‘Pyramids: Adding the melody’ written-out music, labelled for the explanations underneath.
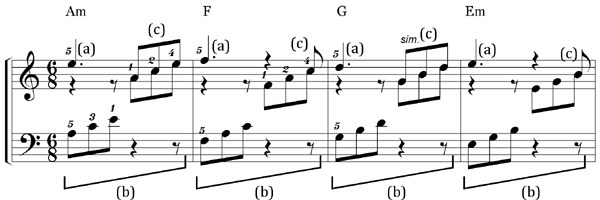
(a) These stems-up notes just after the bar line are the only new notes in the melody-added version. These are the ‘Melody’ notes in the chord chart.
(b) These bracketed groups of six (three left-hand, three right-hand) notes are the Basic Music-making Position notes you played in the previous performances. The chord symbol above each bar tells you how to find these notes quickly and easily.
(c) Notes with stems going up as well as down are BMP notes that have been ‘promoted’ into the melody. Try to play them with a little extra volume so that they stand out from the stems-down notes.
This sounds more difficult than it is! You can start by just trying to make the right hand louder than the left. Singing the melody to yourself can also help.
(section video)
Now go on to Lesson Four.
|
OUT NOW! |
THE MUSICARTA BEAT & RHYTHM WORKBOOK At last! An effective approach to keyboard rhythm & syncopation skills. Learn more! |
ONLY $24.95! |
PYRAMIDS |