Pyramids Variations - Lesson One
Playing Pyramids in the Basic Music-making Position
The first Pyramids Variations lesson will teach you to play this tuneful chord-based piece - Pyramids in the Basic Music-making Position.
Here is an audio file of your lesson performance.
More video performances are at the end of the page.
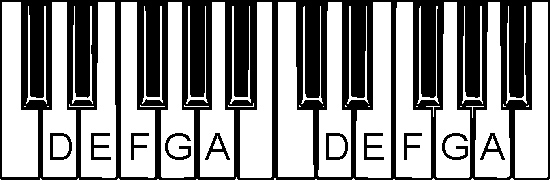
The names of the keys
The only technical information you need for this lesson is to know the names of these six piano keys.
Method
- You find the white piano keys by using the groups of two and three black piano keys as landmarks.
- ‘D’ is a white key inside the group of two black keys.
- The musical alphabet now unfolds left to write, just as if you were writing it down…
- …up to G, when it starts again at A.
For Pyramids, we need to know five keys going down (to the left) from A.
Learn the names of all the piano keys using the flashcards in your download folder or download from these URLS:
(section video)
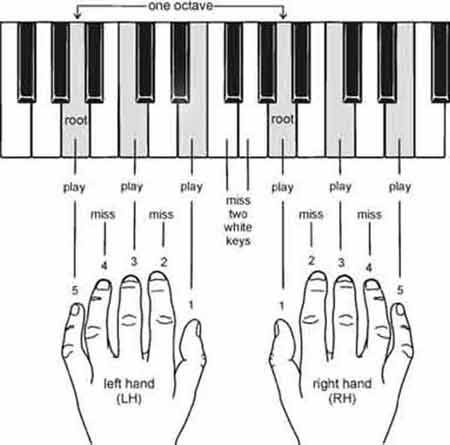
The Basic Music-making Position
Musicarta’s Pyramids Variations is built up from Basic Music-making Position (BMP) chords. The BMP makes finding chords at the piano easy. It’s a hand position where all the notes go together, because they are all notes of the same chord.
To start finding chords at your keyboard, copy the diagram below.
Each hand covers five white keys, with two unused white keys between the hands. You play the notes under fingers 1, 3 and 5 of each hand (numbered from thumb = 1), and miss out the notes under fingers 2 and 4.
For this reason, we sometimes call this chord a "play one, miss one, play one, miss one, play one" chord.
The two unused keys between the two hands ensure that the right hand notes sound good with the left hand notes, because the hands are ‘an octave apart’ – the bottom note in each hand has the same name (see diagram).
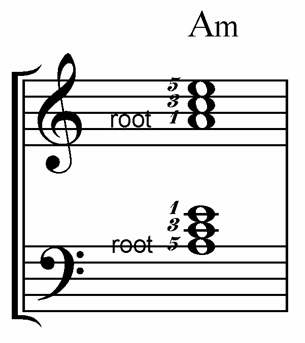
Naming and writing the BMP chords
Three-note Basic Music-making Position chords like these are named after their lowest (left-most) note. This name-note is called the ‘root’ (see illustration).
|
The hands in the illustration are arranged to play an A minor chord. The lowest note of each chord – left hand little finger (LH5) and right hand thumb (RH1) – is an A.
All six notes can also be called
‘chord tones’ because they are all proper notes of the chord. In written music, with your left
hand in the middle of the keyboard, these notes look like the illustration, right, and sound like this audio clip. |
 |
(section video)
The Pyramids chord sequence
In the music example above, you will see the letters ‘Am’ above the written music. This is the ‘chord symbol’ for the chord “A minor” – and also how how to say ‘Am’ out loud.
Most popular music is built on a string of underlying chords called a ‘chord sequence’. Good popular music players read the chord symbols in the chord sequence and instantly know which notes to play, often without using any written music at all. Learning Pyramids and using the Basic Music-making Position will teach you how to do this, too.
The following chart shows the Pyramids chord sequence for. You are going to play through the chord sequence, along the top line (bars 1 to 8), then along the bottom line (bars 9 to 16), using the Basic Music-making Position.

If there is a small ‘m’ in the chord symbol, you say “minor” for it – “A minor” in bar 1, “E minor” in bar 4, and so on. Otherwise the chord is major and you call it by its letter-name alone. You don’t have to say the ‘major’ part.
In your first Pyramids performance, you only uses Basic Music-making Position chords.
The chord symbol names the lowest note in the BMP chord – the root of the chord – in both hands. So if you copy the Basic Music-making Position in the first illustration with your left hand little finger (LH5) and right hand thumb (RH1) on, say, the F key, you will have found the six notes of the ‘F’ chord – bar 2 of the Pyramids chord sequence.
This way, you can play a whole piece just from the chord symbols in the chart.
The little arrows in the chord chart show you whether to move down (to the left) or up (to the right) to find the next chord, but you always move to the nearest new chord anyway.
(section video)
E major and E minor chords
Pyramids is played on only the white piano keys, except for the E chord in bars 7, 8 and 14 of the chord sequence.
A Basic Music-making Position chord built on E using only the white piano keys produces a minor chord. But in bars 7, 8 and 14, there is no ‘m’ after the chord’s letter-name E, so we know that a major chord is required.
To change the white-key E minor chord (Em) to an E major chord (E), we have to raise the middle note from the white-key G to black key G sharp (G#) just to the right (see illustration).
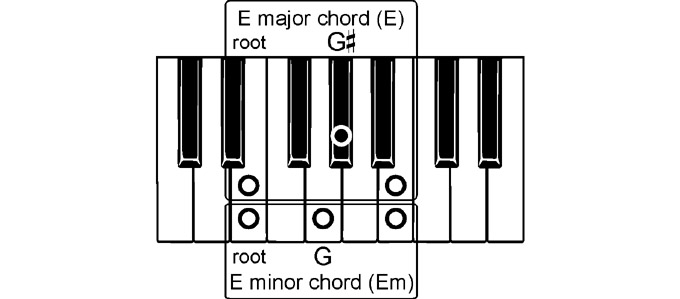
All the other chords, including the E minor (Em) chord, use only the white keys. You do not have to do anything special to make them major or minor.
Place your left hand little finger and right hand thumb on the name-notes, and let the ‘play one, miss one, play one, miss one, play one’ finger pattern find the chord for you.
The E major chords in the bars 7, 8 and 14 of the Pyramids chord sequence are marked with an asterisk (E*), but you will not normally get this helpful reminder.
The six-eight time rhythm
All music has a beat, or a rhythm, which is indicated in written music by two numbers called a ‘time signature’, which you will always find at the start of a piece of music.
The rhythm of Pyramids is called ‘six-eight’. We say: “Pyramids is in six-eight.”
To get an idea of what ‘six-eight time’ feels like, play the performance audio on-page and say over and over to yourself:
“ONE–and–a TWO–and–a ONE–and–a TWO–and–a…”
…with each word coming as regularly as possible. ‘One’ is the strongest beat.
In the Pyramids Variations chord chart, each chord symbol stands for six evenly-spaced BMP notes, played from lowest to highest in the six-eight “ONE–and–a–TWO–and–a” rhythm.
In written music, each set of six notes is separated by a bar line.
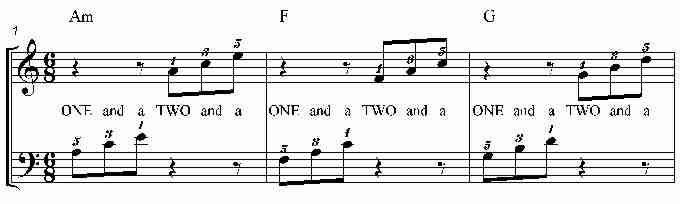
The music shows the first three bars/chords of the performance.
The written music example also tells you which fingers play the notes. Even if you don’t read music, you can see that you play, in order:
- Left hand little finger (LH5), left hand middle finger (LH3), left hand thumb (LH1), then
- Right hand thumb (RH1), right hand middle finger (RH3), and right hand little finger (RH5).
This is the usual fingering for a BMP chord.
(section video)
Playing the Pyramids chord sequence
Now go ahead and play the Pyramids chord sequence.
- For each of the 16 chord symbols in the Pyramids chord sequence, you place your left hand little finger (LH5) and right hand thumb (RH1) on the name-note of the chord, as shown in the Basic Music-making Position illustration.
- Then you play the six notes evenly from lowest to highest (from left to right).
Here’s the chord sequence again.
The little arrows in the chord sequence show you whether the hands move up the keyboard (ö – to the right, higher notes) or down (ø – to the left, lower notes) to play the next chord.
So the first arrow tells you that, after you have played the
A minor chord, you move your hands to the left (down) for the F chord, then up
(to the right) for the G chord, and so on. You always play the nearest 'next chord'.
The asterisk on the E* chord symbol in bars 7, 8 and 14 reminds you to change the all-white-key E minor chord (Em) into an E major chord by using the black key G# (G sharp).
(section video)
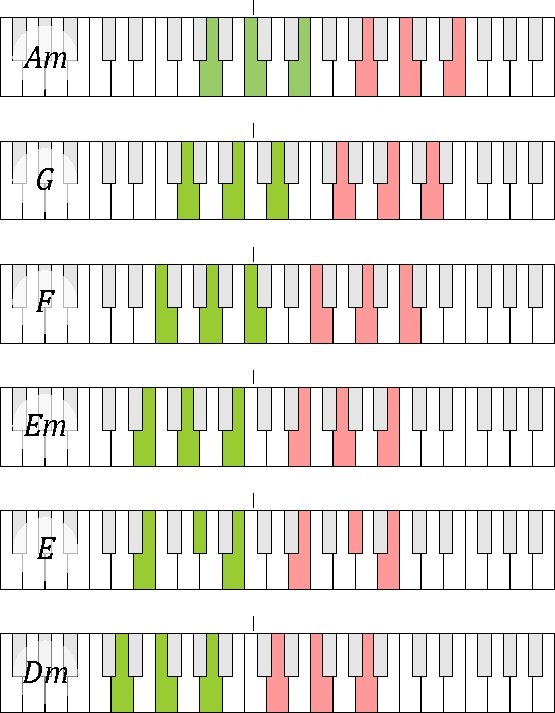
Keyboard chord diagrams
Here are the keys you use for the six chords you need to find. The chords are arranged highest to lowest, not in the order you play them.
Here is the lesson performance played on MidiPiano with the piano roll pane activated.
Watch it MisterMusicarta YouTube
Here is the MidiPiano performance with the scrolling MS (written-out music).
Polishing your lesson performance
You might need some practice to get a smooth performance.
You can improve your performance by playing any of the chords in the chord sequence over and over until you get six even notes.
Jumping to the next chord in a chord sequence without
slowing down always takes practice. The secret is to let your left hand set off
to find its new chord as soon as it has finished playing its three notes.Set off early to get there on time!
It doesn’t matter if your performance is a bit different from the written music or the performance files as long as you find and play the chords somehow!
Listening carefully is practice, too. Follow in the music as you listen to the lesson performance – be sure to glance at the chord symbols above the music, too.
You can just read through the chord chart as you listen to the performance in the same way. Challenge yourself to know where you are in the chord sequence at all times.
The written-out music showing the Pyramids chord sequence being played using the BMP is in your workbook, but try to play the performance from just the chord sequence - it's more creative.
Some illustrations you might find helpful are gathered together on Visual Prompt Sheet 1 on page 66 (and in your download folder).
|
|
Sign up for the Musicarta News! Get an overview of Musicarta in manageable monthly slices, keep up to date with new postings and get the latest discount codes. The Musicarta News - regular encouragement to learn and progress! |
|
OUT NOW! |
THE MUSICARTA BEAT & RHYTHM WORKBOOK At last! An effective approach to keyboard rhythm & syncopation skills. Learn more! |
ONLY $24.95! |


PYRAMIDS |
YouTube playlists