Patreon MUSICARTA Premium
Broken Chord Patterns
Broken chord patterns are the classic way of learning and practicing keyboard chords. Broken chord patterns help you recognize the keys and train your hand to find the chords and move easily between inversions. Even better – broken chord patterns are ‘nearly music already’, so you can add a rocking bass line and be tapping your foot as you practice!
Here are two of the performances that this module builds up to.
Keyboard Chords – Broken Chord Patterns 1 is part of the Musicarta.com Patreon Premium subscriber content.
Please dive right in and try it out – but you may get more out of the module if you have studied the Finding Inversions modules which build up to the Broken Chords pages first. Click through to the first Finding Inversions lesson here and work through the series.
The basic broken chord pattern
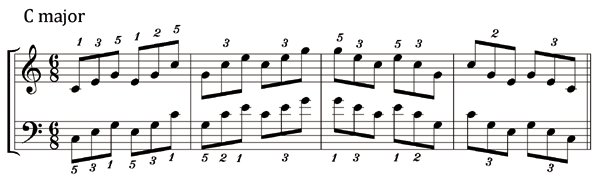
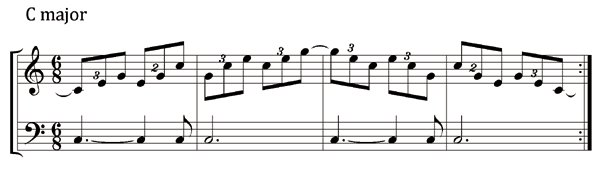
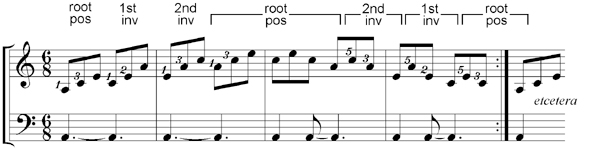
Here is a basic exam-style broken chord pattern.
PLEASE NOTE that you DON'T have to be able to play this exercise to carry on studying the module!
Practicing this pattern until you’re good at it will certainly make you a better pianist, but it won’t make you a better musician unless you examine the ‘what-and-why’ of it.
Firstly, the notes are beamed in threes.
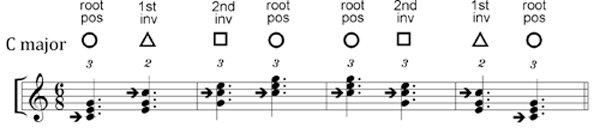
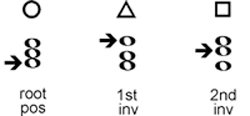
To get a better idea of 'what's going on', in your mind’s eye you push those groups of three beamed notes back into line to find the inversions that are being used.
Popular musicians don’t really need to be able to play broken chord patterns in the left hand, so we’ll just look at the right hand inversions.
Note also that the exercise tells you what chord you are playing (C major), so your musician’s eye will automatically register which of the three notes in each triad is the root, or name-note (arrowed), and this will help you find the triads.
The '3' or '2' above the chord tells you which of your RH fingers play the middle note.
Fingers 1 (thumb) and 5 are always used. Finger three is used in for the middle note in the root position and second inversion (1-3-5), and finger two for the ffirst inversion (1-2-5).
This is the basic broken chord pattern our exploration starts with:
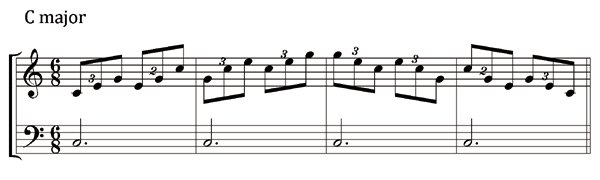
You play the broken chord pattern in the right hand but just the root in the left hand. The chord (C major) is given, so your left hand will gravitate to root C automatically.
Build up the rhythm
As a musician, everything you play should have rhythm, and broken chord patterns are an ideal opportunity to ‘multi-task’, building your rhythm skills at the same time as learning your chords inside out.
Here’s one option for building up the rhythm.
Note that this pattern has repeat marks – the first right hand note plays only the first time. In fact, you should play all the broken chord patterns in this module over and over – repetition works wonders. You should actively look for weaknesses in your performance, and ‘iron them out’, like creases in a shirt.
Two new things have happened. The left hand (bass) has a little ‘kick’ note. Adding rhythm to the exercise like this drives it on – you actually want the notes to come. The right hand then gets some tied notes – a simple way of adding a little sophistication.
These things make the pattern quite a bit harder to play.
If it continues to be hard to play, top and work out what notes come together, and when. Musicarta calls this methodical time-saving approach ‘Together, left, right’ (TLR) analysis.
'Together, left, right' (TLR) analysis
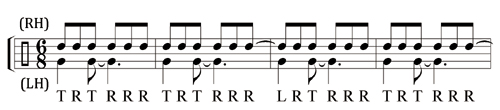
Here’s the new pattern again.
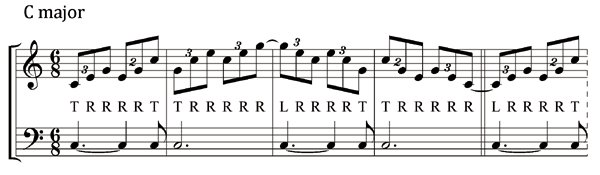
The row of letters between the staves shows whether the hands play together (T), or just the left hand plays (L), or just the right hand plays (R).
You will make much faster progress mastering rhythms like this one if you
- Ignore the notes to start with.
- Analyse the order of together/left/right ‘events’, and
- Tap the pattern out away from the keyboard first WITHOUT BOTHERING ABOUT THE RHYTHM first. (Your first priority is the sequence of together/left/right events.)

Look closely to see that Right plays every beat except for the tied note every two bars after the beginning.
The stand-out ‘togethers’ (T) and ‘lefts’ (L) are bolded for emphasis. You tap the pattern with just your fingertips until you’re fairly sure of ‘the right thing happening next’ and the rhythm has crept back in, like this:
You might not need to go through this build-up process – you might be able to ‘just sit down and play it’. But you will probably find riffs in the Musicarta material where this method will avoid you a great deal of frustration IF YOU REMEMBER TO USE IT.
- Strip out the rhythm and identify the together/left/right ‘events’.
- Tap them out off the keyboard, ignoring the notes AND EVEN THE RHYTHM IF NECESSARY.
- Get the rhythm back in.
- Put the music (notes) back in.
Play the pattern using a different chord
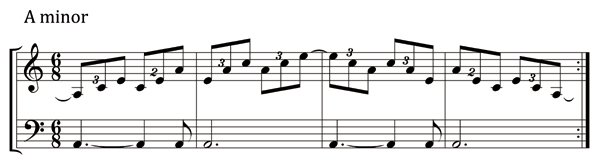
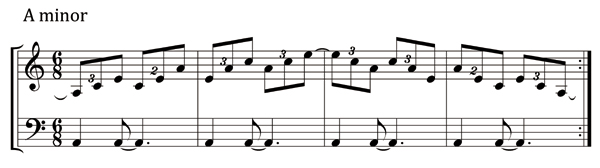
Before we develop the rhythm further, let’s play the pattern in A minor. A minor is an all-white-key chord (like C major), so all we have to do is move our hands two white keys to the left and play the exact same pattern.
But before you ‘dive into the dots’, use a bit of musician’s savvy…:
- Because in our mind’s eye we always ‘bunch up’ broken chords (to see which inversions they are), and
- We are given the chord (‘A minor’), and
- We know which note of a root position / first inversion / second inversion chord the root is:
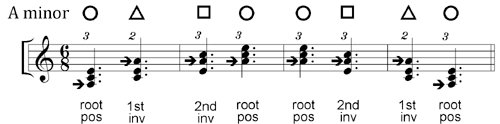
And...
- We know what the chord tones of A minor are (A, C and E – every other letter of the musical alphabet up from the root)
So we don't stress over the leger lines, or even pay much attention to the individual notes. The right thumb goes straight to note A to start building a play-one, miss-one, play-one, miss-one, play-one (PMPMP) root position triad – which then starts ‘inverting’ upwards.
Play the pattern in A minor. Here’s the audio performance file again:
Developing the rhythm
Here’s a natural development of the previous rhythm:
The coordination of the hands is even more complicated. Here’s the TLR ‘beat map’ of the example, showing the order of ‘events’:
Tap that with your bunched fingertips in your desktop. Then, STILL AWAY FROM THE KEYBOARD, ‘mime’ the right hand with the correct fingering:
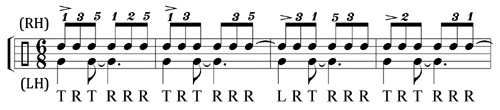
Now go back to the keyboard and try the exercise again:
Repeat the build-up process if you can't achieve the performance yet.
Practicing away from the keyboard is very valuable thing and a great habit to get into. You rehearse coordination skills without the worry of getting the notes right. There are lots of tapping (rhythm) patterns in the Musicarta ‘Beat and Rhythm’ section you can carry around with you and practice at odd moments. Finger exercises (Hanon, Schmitt) are ideal candidates as well.
Developing the pattern
We can make the right hand more interesting by changing the order of the chord tones on the way down. Look closely to see where the difference is.
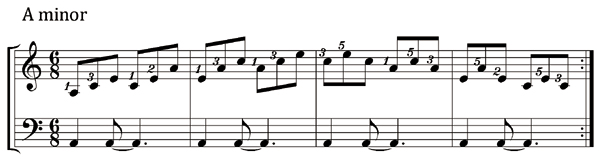
Now you have to look more closely to see where the inversions are – the quaver beams no longer show you. You need to identify the inversions so that you use the official fingering and you don’t run out of fingers.
If the syncopated beat in the left hand is too difficult for you, just play one long note (as shown in the first two bars) to start with. (You always have the option to simplify this way - temporarily or permanently.)
Transposing the broken chord patterns
You can play these broken chords patterns in different keys just by starting on a different white piano key.
You don’t even need new written music to do this. You just shift your starting position left or right (down or up), look at the old music and play the same pattern of jumps with the same fingering.
Start on any white note except B.
- If you start on C, F or G you will get a major sound.
- If you start on A, D or E you will get a minor sound.
Remember which of the spaced bunches of notes is the name-note (arrowed):
More broken chord patterns
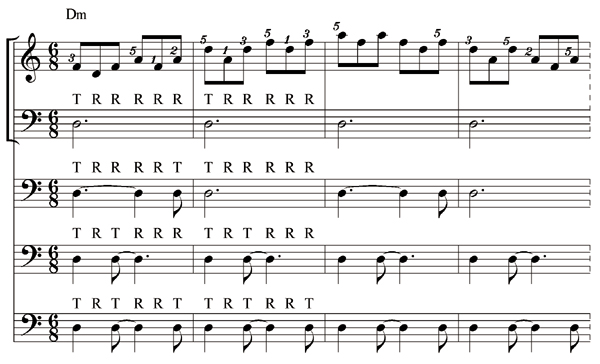
Here is a broken chord pattern in D minor that starts on the middle note of a root position triad.
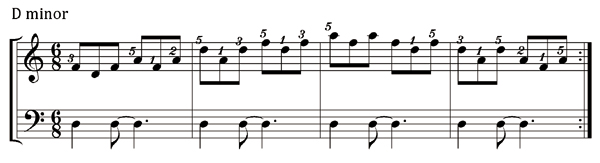
It’s still based on the same inversion pattern as all the previous patterns in this module:
Look at the pattern again to work out where the fingering will change.
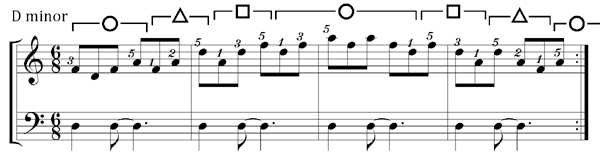
Play through this module a few times, until your fingers are used to the creeping-up-and-down movement and your eyes can see the next inversion up or down "just like that".
Then go on to Page Two of the Broken Chords series.
A two-chord broken chord riff
If we combine this pattern in D minor with the same pattern in C major – everything shifted one key to the left – it makes a good classical rock riff.

Don’t just dive in and flounder! Use all your musician’s tricks to stay in command of the material (rather than the other way round).
- Play just the right hand. Notice the slight adjustment to the right hand fingering at the start and end of the second line. Do you see why it makes sense?
- Notice that the left hand has acquired another note, so there is a new together/right/left (TRL) profile. Examine it carefully, and practice away from the keyboard first.
- The performances are getting faster – push yourself, speed and endurance-wise.
This is the fourth development of the left hand rhythm. Build up to your performance by playing the right hand of the pattern over all four versions. (The audio performance file alternates between D minor and C.)
Take time out to appreciate how much more ‘ownership’ this way of working gains you than ‘just practicing’. By methodically working your way through all these permutations, you edge closer and closer to the point where you can just play what you hear.
Transposing the two-chord riff
The D minor–C major pair of chords is made up of one minor chord (Dm) with a major chord (C) a whole tone below. A minor and G major form a similar pair, both also all-white-key chords.
Here’s a two-chord riff in A minor and G which re-uses the right hand of the second pattern in this module over the latest bass line:

Take a minute to ‘just look at it’ before you try to play it.
- Don’t spend much time reading those G chord leger lines (second line). A glance at the overall shape should tell you it’s the same pattern as in A minor, but one note down – one key to the left.
- The bass is new again – a bar of line four and a bar of line three from the previous diagram. Check to see you understand this – combining half of one thing you know with half of another is a powerful way of making new music.
- Do your own TRL analysis and tap it out, then mime it with the fingering as before.
- The fingering has been adapted at the end of the first line, and the first three notes of the repeat will also need re-fingering 2–4–5.
The purpose of these Musicarta Broken Chords series modules is to persuade you to practice broken chord patterns regularly and creatively. The benefits for your song-writing, arranging and playing are enormous.
This module has dealt only with the simplest patterns in white-key-only chords - the ‘Group One’ chords on the Musicarta Chord Generator.)
Committed students will go on to transpose the patterns into Chord Generator ‘Group Two’ (one black key) chords – D, A and E major and C, F, G and B minors.
These are much more challenging for the hand – you will find you have to play much further up towards the back of the keys, and ‘climb over’ the black keys that are ‘in the way’.
Try playing the two-chord riffs in E minor with D major, G minor with F major and B minor with A major.
Click through to Broken Chord Patterns 2 for more patterns to work on and more ready-made broken chord riffs to play, or just click through and bookmark for study later.
|
OUT NOW! |
THE MUSICARTA BEAT & RHYTHM WORKBOOK At last! An effective approach to keyboard rhythm & syncopation skills. Learn more! |
ONLY $24.95! |
PATREON |
The MusicartaA methodical approach to keyboard syncopation for
|
PUBLICATIONS
exciting keyboard
creativity courses
CHORDS 101
WORKBOOK

~HANON~
video course

Musicarta
Patreon
PENTATONICS
WORKBOOK
video course

Creative Keyboard
video course

BEAT AND RHYTHM
WORKBOOK

- Volume 1 -

12-BAR PIANO
STYLES WORKBOOK
MUSICARTA MODES
WORKBOOK

PIANO STYLE
CANON PROJECT
video course

VARIATIONS
video course
- Piano Solo -
video course

- Piano Solo -

YouTube playlists