The Musicarta Canon Project - Module Four
Triads in the Right Hand
To take your Canon performance any further, you have to be able to play the Canon piano chords with the right hand alone. This is a simple matter of fingering. From these right hand triads, you can then make beautiful-sounding broken chord patterns – the heart of modern popular keyboard playing.
Here's a sample of what you'll learn to play in this module.
Learning the right hand triads
Watch the live teaching video for this section, then work through the components below.
Here are the individual teaching videos.
The right hand Canon chords are fingered in four pairs.

You see that a ‘next-door note, next-door
finger’ principle applies. Fingers 5 and 3 always fall to 4 and 2, with the
opposite in the last pair. The thumb always plays the bottom note.
Revise the bass line
As your performances get more complicated, it’s essential to have at least one hand that comes ‘practically automatically’. Revise the bass line from the familiar diagrams below, paying particular attention to the fingering, which is the secret of this dependability.
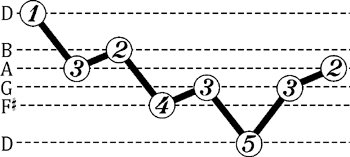 |
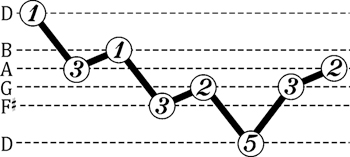 |
Right hand triads and bass line together
Play the right hand triads plus the bass line. Try to finger them correctly from the start. Play them on their own first, then over one of your backing tracks.

Notice the voice movement diagrams (VMDs) between the chords. Use them to help you remember how the chord tones move. (The letters above the chords are chord symbols. You learn about chord symbols in the next module.)
Solo right hand triad patterns
Here is the live teaching video for this section.
Here are the individual teaching component videos.
See if you can play these triad patterns from previous Canon Project modules with the right hand alone, over your left hand single-note bass line.
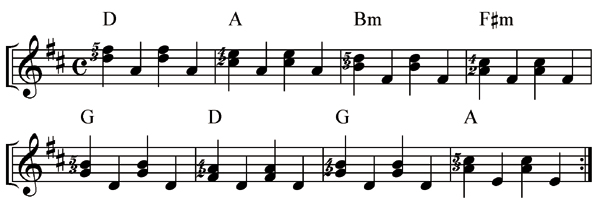
Note that all the music – stems-up or stems-down – is now right hand music.
You only need to change the length of some notes or chords to get quite a different feel. Listen to the next performance audio.
Here's the music.
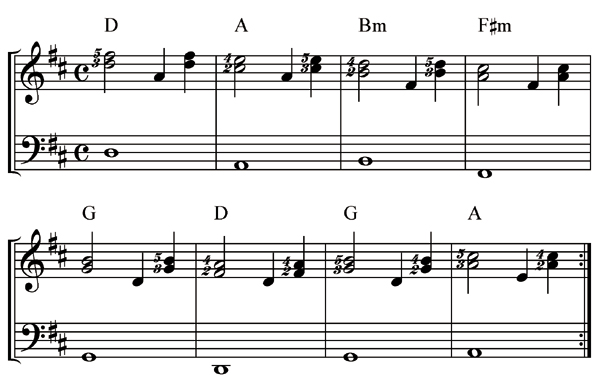
Audio challenge 1
Here's your first module audio challenge.
Listen to this audio performance. The right hand plays a pattern made up of elements you have just learned. Can you hear what is happening, and copy?
Here's a video of the simple triads and bass line the audio is made of. Try to cover the chords along with the audio and imitate the right hand pattern.
The 'answer' video is at the foot of the page.
Developing the bass line
Take advantage of the relatively simple right hand chord pattern to develop the bass line.
Here is the teaching video for this section.
Now work through the component videos on your own. Here's the music.
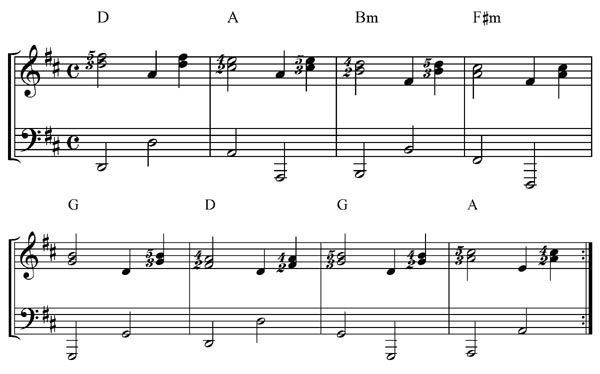
Don’t let yourself be hypnotised by the leger lines in the bass clef. The chord symbol (the letter above the music) tells you what both the bass notes are – you don’t have to count down the lines to find out.
When you get a new ‘trick’ like this to master, it’s a good idea to simplify things if you can, and build up to the new thing gently. For example, it would be a good idea to study and practice the new ‘bouncing’ bass line on its own, first.
Then rehearse the new bass with plain chords.
Only then should you ‘put it all together’. Build-ups like these take a little longer and can feel like a waste of time, but they’re far better than trying and trying and getting discouraged. Build-ups also encourage you to see performance as a combination of elements, which is the creative way to see music.
It doesn’t matter if you don’t play the bass line exactly as written – just play two root notes per bar with the left hand. You might prefer a different top root/bottom root pattern. Also, you can play the whole bass line an octave higher – especially if you’re working on a shorter electronic keyboard.
The chords an octave lower
Finally, find the right hand chords an octave lower. The chords will be written in the bass clef, using leger lines (which you may find confusing), but the chord shapes and note names are the same, just an octave lower. So find and play the chords first, then check the music to see what they look like.

Find the chords in the new place and
rehearse them a few times. Use any of the drum backing tracks (CBT_D…) and see
if they inspire some rhythm in your performance.
Audio challenge 2
Now, listen to this audio clip. It’s the
chords you’ve just found played with a slow rock ballad feel. The left hand
plays two bass notes per bar, on beats one and four.
Try to play the riff from the audio file before watching the following video. It shows the complete build-up:
- The triads an octave lower over a simple bass line;
- The simple triads and bass line with the audio challenge pattern playing;
- MidiPiano playing the audio challenge pattern.
Here is the written-out music.
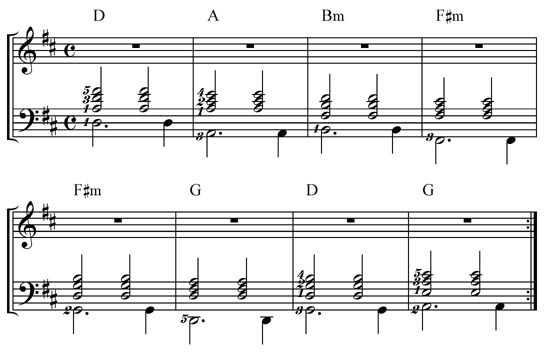
Your performance would sound good over over one of the drum tracks - perhaps CBT_D01.
Audio challenge 1 - answer
Here is a video of the Audio Challenge 1 pattern.
Notice the 'by the book' fingering. You start out having to work out the fingering all the time, but after a while your hand starts making intelligent choices for you. Stick at it - you can't play the music you want to hear if you don't have the fingers available.
Study Tip: Support file reference number
Your download support files are coded as follows.
- CPM Canon Project MIDI – the MIDI file. Play in MidiPiano to see-and-hear the performance, or in your media player as basic-quality audio, or load into your sequencer to experiment with.
- CBT Canon Backing Track – an audio backing track. Play and loop in Audacity (preferably) or your regular media player.
- CBT_D Canon Backing Track_Drums. An audio drum backing track. Short, and best looped in Audacity.
It's not essential that you use all types of files. They are there as resources for you to experiment with.
|
OUT NOW! |
THE MUSICARTA BEAT & RHYTHM WORKBOOK At last! An effective approach to keyboard rhythm & syncopation skills. Learn more! |
ONLY $24.95! |
THE MUSICARTA
|
The MusicartaA methodical approach to keyboard syncopation for
|
PUBLICATIONS
exciting keyboard
creativity courses
CHORDS 101
WORKBOOK

~HANON~
video course

Musicarta
Patreon
PENTATONICS
WORKBOOK
video course

Creative Keyboard
video course

BEAT AND RHYTHM
WORKBOOK
- Volume 1 -

12-BAR PIANO
STYLES WORKBOOK
MUSICARTA MODES
WORKBOOK
PIANO STYLE
CANON PROJECT
video course
VARIATIONS
video course
- Piano Solo -
video course
- Piano Solo -


YouTube playlists


 THE LOGO
