The Musicarta Canon Project Module Eight
Accompaniment with RH Thirds
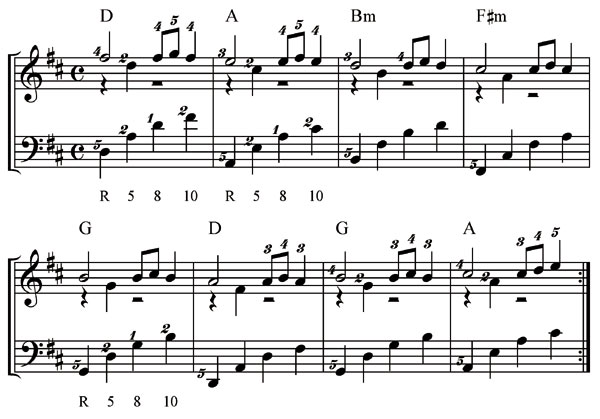
A solo performer needs to be able to play the accompaniment in the left hand while the right hand plays the melody – the music the listener mostly hears. In this module, you will be playing some of the right hand thirds patterns from Modules One and Two over your own left hand solo accompaniment. Here is one of the combinations you will build up to in this module.
It’s essential to know the R, 5, 8, 10 left hand accompaniment pattern in all six Canon chord positions by heart to play solo Canon variations. Revise the pattern using the three different left hand/right hand combinations suggested in Module Seven, using this ‘practice prompt’:
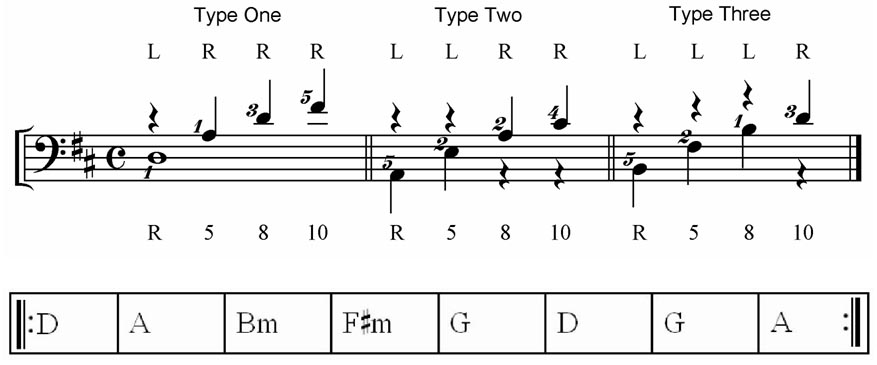
Play through the whole chord sequence using the Type One (L, R, R, R) hand combination, then using Type Two (L, L, R, R), then Type Three (L, L, L, R). Use the MIDI performance file CPM_M7_08 from Module Seven to guide you.
Playing the accompaniment with the left hand
Playing the accompaniment with the left hand alone is made possible by passing the left hand second finger (LH2) over to play the fourth chord tone – the tenth (10). Play the R, 5, 8, 10 pattern through the whole Canon chord sequence using the 5, 2, 1, 2 fingering to start getting the feel of it.
Note that you would never usually have the fingering put in every bar (as in the following music) – that’s just a reminder for the first time you do it.
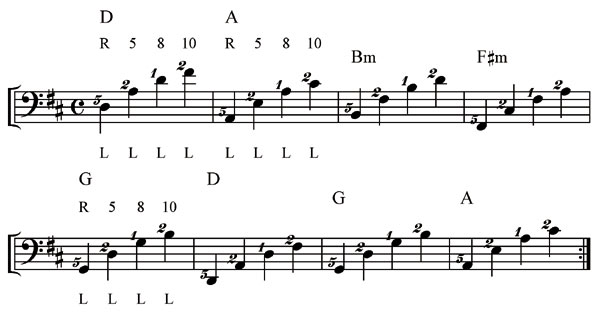
Practising the 5, 2, 1, 2 fingering
When you play a solo version of the Canon, the right hand plays the more interesting, more complicated music, so the left hand has to be practically automatic. Only lots of practice makes finding the R, 5, 8, 10 chord tones with the left hand alone, easy.
You will find three pages of left hand accompaniment practice patterns (PP) in the Accompaniment Practice Patterns supplement at the back of this book. Practise each exercise on a number of different chords – use the R, 5, 8, 10 coding to find the right notes.
LH accompaniment with RH thirds patterns
You are going to play a solo Canon versions made from the new LH solo bass accompaniment pattern plus the thirds from Module One.
First, you have to make sure you can play the treble (melody) parts with your right hand alone. Here are the plain thirds with the another possible RH solo fingering.

Notice that the fingering allows the four pairs of thirds to be played legato (as shown by the slurs). Practice the right hand solo at the speed given.
Now play the thirds over the LH solo R, 5, 8, 10 accompaniment ‘ladders’.
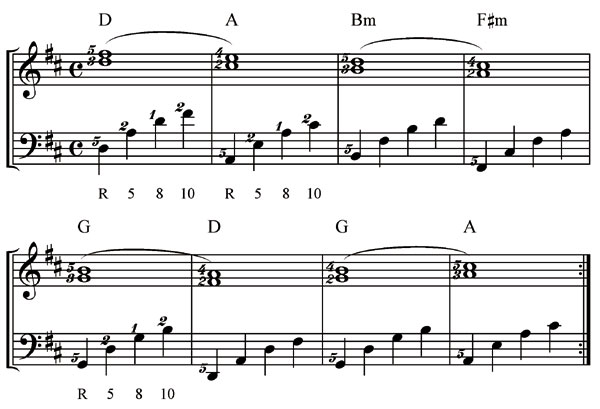
You can break up and ‘roll’ the thirds as before. Notice the new fingering, which helps ‘keep the fingers coming’.
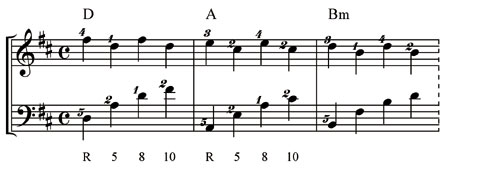
Continue the pattern right through the chord sequence.
Thirds with next-door notes
Next, keep the broken third but add a ‘next-door note’
Again, the special fingering makes playing the version easy. Try to see fingering as a solution rather than as a problem – something that makes playing sweet music possible, rather than an irrelevant chore.
Syncopated thirds
You can make a very nice Canon variation just by syncopating the thirds.

(MidiPiano performance below.)
When you have to tackle a complicated rhythm like this, stop and look-and-listen closely until you’re sure you know ‘what comes with what’ – whether your hands play together (T), or just the left hand (L) plays, or just the right (R).
This is ‘Together, left, right’ (TLR) analysis.
To learn to play such a pattern, abandon the rhythm temporarily and concentrate on finding the notes and getting the together, left, right ‘events’ in the right order, Then, gradually ‘feed’ the rhythm and tempo back in.
Here the TLR analysis (and the counting) for the solo syncopated thirds performance.
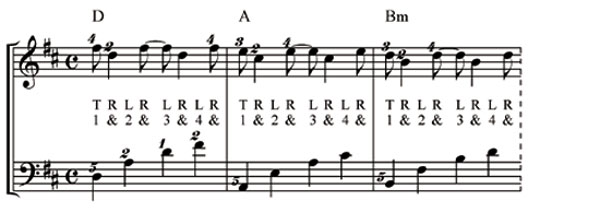
You play something on every quaver beat, but you only play hands together (T) on count “one”.
Finish off the version. You can see now how the new fingering helps you play a legato treble part.
Audio challenge
Listen to this development of the M8_06 pattern.
It should be familiar – it’s actually a Module Two pattern with the thirds 'rolled' (broken up top-bottom).
But it sounds rather mechanical - it needs more variety.
Here’s one possibility.
By dropping some notes, we have made the pattern a two-bar pattern - it only repeats every two bars. The listener's 'ear' gets a rest, and it's more musical.
This is the pattern for your audio challenge.
Tune as contour
Playing by ear requires you to listen carefully for up/down/same movement between melody notes.
The first thing we would probably do is 'strip out' the bottom note of the third, leaving just the top line - we can easily put the bottom note of the third back in later.
Next, we note that it's recurring two-bar pattern, so we really only have to work out one two-bar section, like this.
Then we would want to establish the rhythm of the notes, if at all possible.
Count along and you get this rhythm.
One, two-and three, four-and-one, two-and-three (four).

So you would sketch that out, just as a rhythm. If you don't write music at all, just a row of notes proportionally spaced out will do.
Next, you try to insert arrows to indicate whether the melody stays the same, or goes up, or goes down.

Listen again. Two patterns are played.
The movement in this pattern (throughout the chorus) is to next-door notes.
Put arrows between or above-and-between the notes to indicate whether you thin the tune repeats the same note, or goes up, or goes down.
Go to 'Answers' below to check your work.
At the end of the chorus, the roots go up from G to A, so the melody pattern rises instead of falling - and there's a 'tweak' to get back to the F sharp at the start of the next chorus smoothly.
The rhythm is just the same, though, so you can sketch out the same line of notes to put your arrows in.

Listen to the audio and put your arrows in, then check the answer below.
Answers
First pattern (comes three times)
This is the right sequence of arrows for the main two-bar pattern. Let the audio repeat until you can see that it's the right answer.

We know that out pattern is based on our string of thirds, and starts on the top note (because we cut out the bottom one, remember).
So the first note is F sharp, and the first note of each two-bar pattern is going to be the third of the chord.
Now repeat the pattern in the first position (repeat the first two bars) - so starting on F sharp. Just the right hand first, then with the left hand.
Second pattern (last two bars)
To smooth out the melody line the last two
bars (chords G and A) have to be adjusted, because the roots move up. This is what you should have.

Play the pattern from the arrows, starting on B.
Answers
Now put the rolled thirds back in and play the whole chorus over the left hand root0fith-octave-tenth accompaniment.
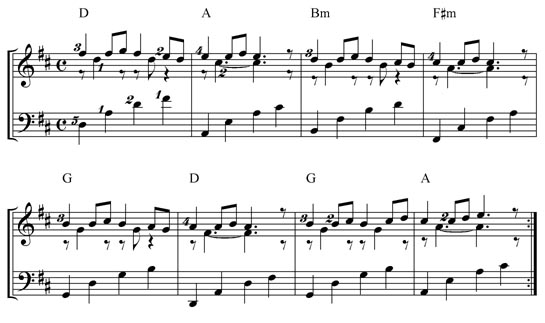
Hearing the ‘contour’ (the vertical shape) of a melody line as a series of ‘same’ ‘up’ or ‘down’ movements is an important part of building your ‘playing by ear’ skills. Think of using arrows as a form of shorthand to sketch out (and make a record of) your own or someone else’s melody lines.
Study tip Always have a pencil by your keyboard and never be afraid to write on music – you can always rub it out!
Write in
- Your contour arrows;
- BMT (bottom, middle, top) coding;
- TLR (together, left, right) analysis;
- Counts and fingering;
- Chord symbols...
– anything, in fact! Just thinking about what you’re going to write makes you think about what you’re playing.
|
OUT NOW! |
THE MUSICARTA BEAT & RHYTHM WORKBOOK At last! An effective approach to keyboard rhythm & syncopation skills. Learn more! |
ONLY $24.95! |
THE MUSICARTA
|
The MusicartaA methodical approach to keyboard syncopation for
|
PUBLICATIONS
exciting keyboard
creativity courses
CHORDS 101
WORKBOOK

~HANON~
video course

Musicarta
Patreon
PENTATONICS
WORKBOOK
video course

Creative Keyboard
video course

BEAT AND RHYTHM
WORKBOOK
- Volume 1 -

12-BAR PIANO
STYLES WORKBOOK
MUSICARTA MODES
WORKBOOK
PIANO STYLE
CANON PROJECT
video course
VARIATIONS
video course
- Piano Solo -
video course

- Piano Solo -


YouTube playlists


