The Musicarta Canon Project Module Two
The Bass Line
If you listen to any classical recording of the Pachelbel Canon, one of the first things you notice is the string of eight low notes – the ‘bass line’. In this module, you will learn to play the bass line with your left hand and the thirds from Module One with your right hand, combining them in a performance like this.
The bass line
One of the first things you hear in most recordings of the Pachelbel Canon is this line of eight bass notes.

This is the ‘bass line’. It uses these six D major scale tones.

Listen to your recording to hear the bass line, then pick out the notes from the music and the keyboard illustration. Play along with your selected recording.
Further on in this module, you are going to play the bass line in the left hand and the thirds from Module One in the right hand. To do this, it is essential that you know the bass line by heart, even if you still use written music as a reminder.
Two things will help you memorise the bass line:
- The shape, and
- The fingering.
The shape of the bass line
It’s helpful to see the bass line as four
pairs of notes. In music, pairs of notes are called ‘intervals’. An interval is
a musical measure of distance. In intervals, all the note names are counted.

Three pairs are the same, and one is different. The three pairs that are the same ‘fall a fourth’; the last pair ‘rises a second’.
Look at what happens between the pairs.

The pairs of fourths overlap by only one scale-tone – ‘a second’. From the last note, the bass line rises a fourth to repeat.
As a zig-zag line, the bass line looks like this.
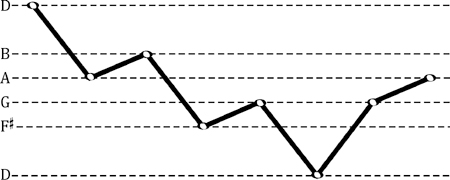
Practice picking out the bass line from the line diagram alone. The note names are shown down the left hand side of the diagram.
Refer to the performance video above, and listen to the bass line until you 'see' the shape in the sound you hear.
Fingering the bass line
You will find it easier to remember the bass line if you always use the same fingering to play it. Here is one recommended fingering.
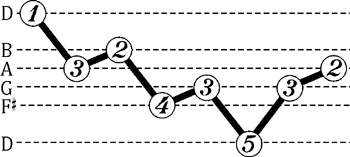
Learning a set fingering will also help you play the bass line from memory. Here’s another possibility.
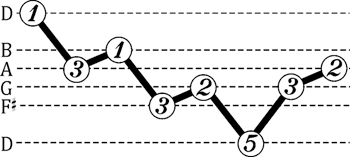
You don’t have to use this fingering, but you don’t want to run out of fingers on the way down to the low D, or on the way back up.
Experiment, and choose a fingering that suits your hand. Learn the bass line by heart with the fingering of your choice. There is an added advantage to learning the bass line thoroughly; later on, the bass line will teach you the chord sequence as well.
Revise the thirds
Revise the thirds from Module Two, using two hands.

In order to play hands together, you have to be able to play the thirds with the right hand alone. First, play all the thirds with right hand fingers 4 and 2 (RH4 and RH2) – over your backing track recording, if you wish. The left hand does nothing.

It helps to remember the ‘slant’ of the thirds – see the lines above the music in the previous example.
To play the thirds more ‘joined up’ (legato), we have to think about the fingering. The simplest thing is to finger the thirds in pairs – 4-2 then 3-1.

Play well up, towards the back of the keys. You can hear that the fingering makes the pairs sound smoother. (This might not be the final fingering. It may change again as you practice more.)
Playing hands together
Now to put the hands together. Here is the music for the simplest possible version – whole notes in both hands.

Here is your performance over a backing track. Play along and take over the ‘solo’.
Thirds variations in the right hand
An easy way to develop this performance is to ‘waggle’ the right hand thirds and double the number of left hand notes (making them half-notes/minims). Study the right hand fingering – it helps you not to run out of fingers.
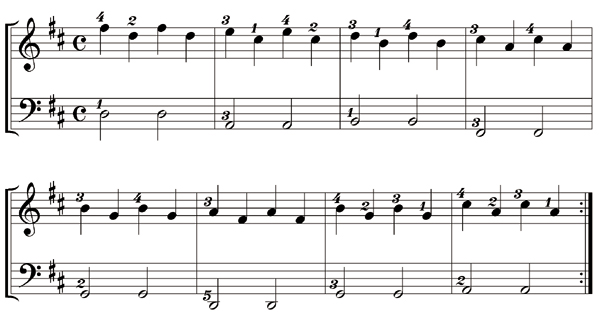
Next, add the ‘next-door-note’ feature to the right hand. The right hand fingering again follows a predictable pattern, helping to keep fingers coming.
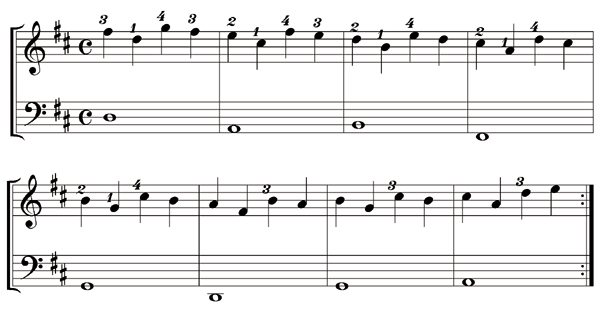
The bass line is shown as simple whole notes, but you can play two half-notes per bar if you wish. Finger the bass line sensibly.
Finally, put the third back together on the first beat.
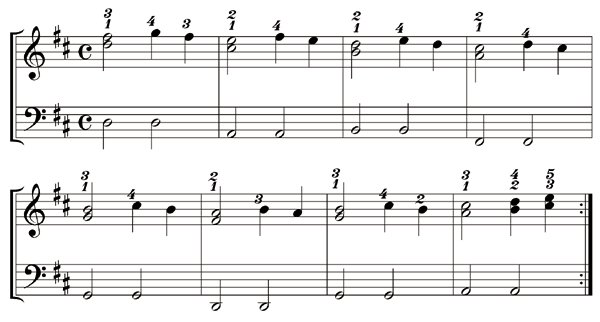
Practice the right hand on its own first. Notice the ‘tweak’ in bar 8 – thirds climbing back up to the starting position.
Here are some more Module Two-type patterns written out for the right hand solo.
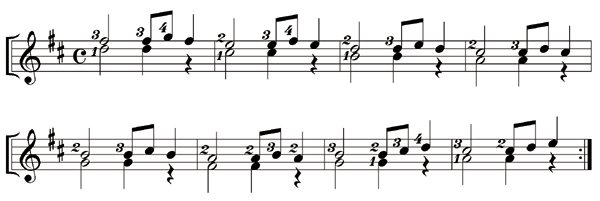
The right hand thumb (RH1) note is shown stems-down. The audio performance has a left hand broken-chord accompaniment which you will learn in a later module. Play just the roots for now.
The next pattern uses exactly the same
notes, but changes the rhythm. (These are all right-hand notes.)
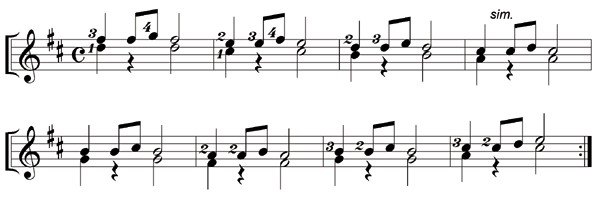
Only the right hand is given. Supply a left hand.
Again, the right hand fingering – swapping from RH3 to RH2 – keeps making fingers available for the sideways movement of the hand. After bar six, the fingering reverses, to ‘creep’ the hand the other way
Notice the indication ‘sim.’ in bar four. ‘Sim.’ is short for simile, which is Italian for ‘the same’. It means, carry on fingering the bars in the same way.
Experiment with combining elements of the patterns you have so far. This is your module performance.
Practice the patterns until you can play along with the audio or backing track, then try playing up to speed over a commercial recording.
Your module audio challenge
Here are two audio-only variations for you to play by ear.
The example uses the same notes - the thirds and next-door notes.
The second audio-only example changes the rhythm of the bass (left-hand) notes.
The written-out music and virtual piano video performance is in the next, 'Answers', section.
'Answers'
Here is the music for your first audio challenge.
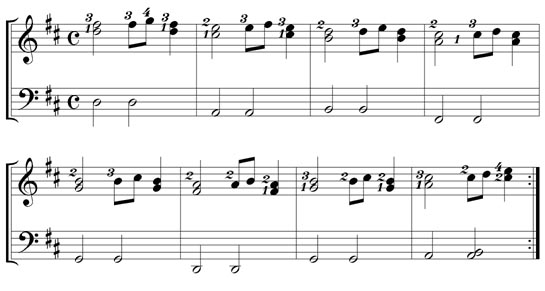
Here is the second example.
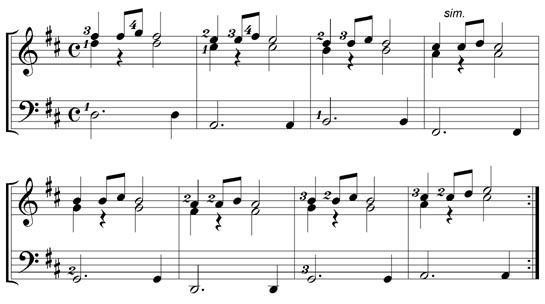
Play over a backing track or commercial recording.
|
OUT NOW! |
THE MUSICARTA BEAT & RHYTHM WORKBOOK At last! An effective approach to keyboard rhythm & syncopation skills. Learn more! |
ONLY $24.95! |
THE MUSICARTA
|
The MusicartaA methodical approach to keyboard syncopation for
|
PUBLICATIONS
exciting keyboard
creativity courses
CHORDS 101
WORKBOOK

~HANON~
video course

Musicarta
Patreon
PENTATONICS
WORKBOOK
video course

Creative Keyboard
video course

BEAT AND RHYTHM
WORKBOOK
- Volume 1 -

12-BAR PIANO
STYLES WORKBOOK
MUSICARTA MODES
WORKBOOK
PIANO STYLE
CANON PROJECT
video course
VARIATIONS
video course
- Piano Solo -
video course

- Piano Solo -


YouTube playlists


 THE LOGO
