The Musicarta Canon Project Module Six
The Chord Sequence
To get anywhere in popular music, you must be able to understand and use chord symbols. Chord symbols tell you which notes – mainly the chord tones – will sound good at a particular point in the music. Chord tones (mainly) and ‘next-door’ scale tones are then used in the melody and for soloing and improvisation.
This module also introduces ‘inversions’. The simplest chord is made of three notes – the chord tones – and any one of the three notes can be at the top. You have to understand this, in practical terms, to move forward in your playing.
Here is a Canon broken-chord inversions study based on the content of this module.
You will learn the module performance once you've had a look at the inversions and broken chord patterns it uses.
Study tip There is a lot of new information in this module. It is not necessary to understand it all perfectly in order to carry on working through the Musicarta Canon Project, but, if you aim to ‘just sit down and play’, you will, in the end, want to know this material ‘in your bones’.
Also, in order to find the chord tones – essential for interpreting chord symbols – you need to know your D major scale. Use the scale practice patterns in the Key of D Major supplement, and start all your Canon Project sessions with some D major scale work.
The Canon chord symbols
Here is the teaching video for the first part of this module.
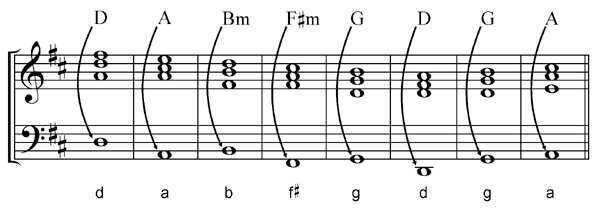
Here is the music example we will be working with. (We sometimes call it 'the usual string of triads/triad string'.)

Notice that the letter in the chord symbol also names the bass (left hand) note. In popular music, the bass note is usually the name-note (root) of the chord.
Inversions
Now look at the chords in the treble clef. You see that two chord symbols – D and A – have two different chord shapes under them.

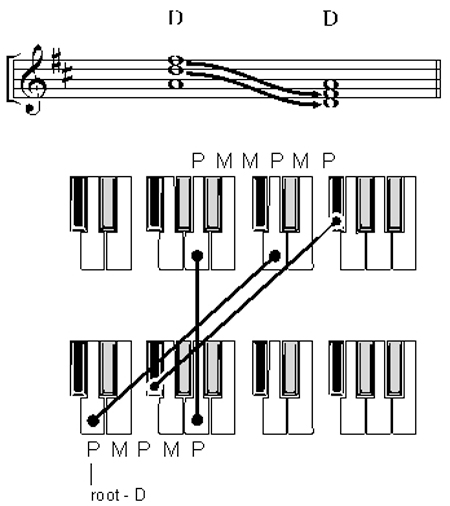
How can these different shapes be the same chord? Because they are inversions – the two chords are made up of the same notes.
Look at the D chords illustration below. The D and F sharp notes can be either side of the A. Copy the
audio and MIDI performance clips to discover the inversions.
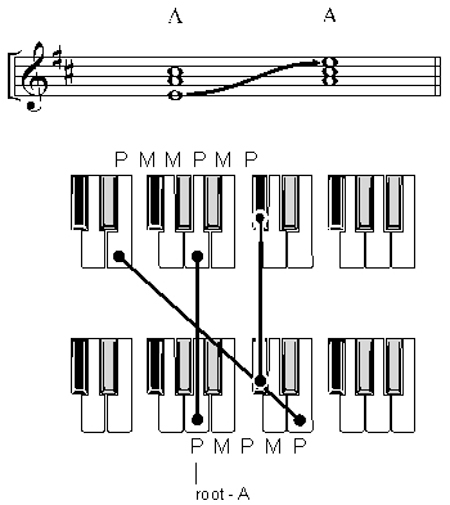
Do the same thing with the two A chords (following page). Here, only one note (E) moves from bottom to top, but both chords are made from A, C sharp and E notes.
‘Root position triads’ – PMPMP chords
Note the ‘P’ and ‘M’ in the keyboard illustrations. They stand for ‘play one’ and ‘miss one’ (D major scale tones). Once chords are flipped into ‘play one, miss one, play one, miss one , play one’ arrangement (PMPMP), they are called ‘root position triads’, and only then can we name them after the lowest note.
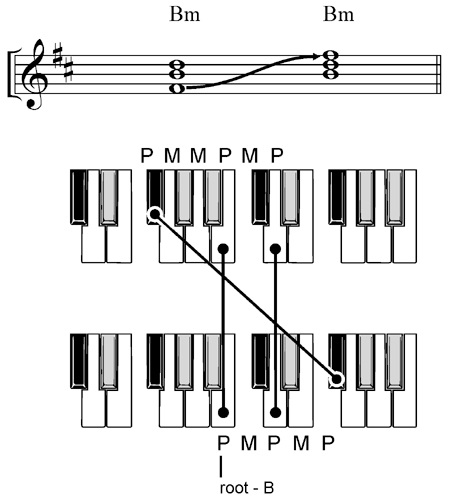
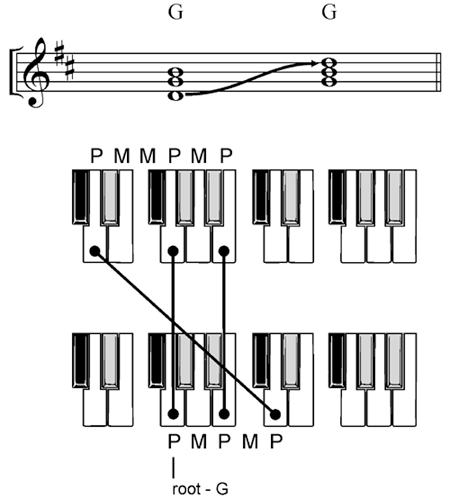
Here is a single video of all these inversion operations. Practice until you can follow at this speed.
The roots in the Canon RH triads
Here are all the Canon chords again, with the roots of the right hand triads indicated.

You should be able to play through the chord string and name the roots.
Copy the audio/MIDI performance. It’s essential that you start to ‘see’ the root of the right hand chords, which is often not the bottom note.
Forming inversions
Here is a teaching video for this section of the module.
Inversions are named upwards from root position. You make the first inversion by taking the bottom note of a root position triad up an octave to the top. Repeating the operation gives you the second inversion. The third time you perform the operation, you get back to a root position (PMPMP) triad.

(These are all D chords. The arrowed note is the root, or name-note.)
You can just as easily make inversions by taking the top note to the bottom, but then the counting goes ‘the wrong way’ – root position, second inversion, first inversion, root position.

Inverting the Canon chords
Practising making inversions, and cycling through them, helps you see the chords in the keyboard, and is essential work for any modern keyboard player. Also, broken chord studies, which cycle through the inversions, are practically ready-made music.
Here is an inversion drill in D.

(The illustration does not show the final inversion up to a first inversion.)

(The illustration does not show the first inversion the video/audio starts on. Study it anyway.)
Inversion drills
Practice until you understand the pattern, then perform this inversion drill for all five Canon chords. Here are your starting chords shown on keyboards, and what your practice should look and sound like.


Broken chord drills
Cycling speedily through the inversions of a chord gives what are called broken chord studies. All the major exam syllabuses include broken chord studies.
The simplest broken chord study (in D) is this (but see the teaching video further down).

The pattern plays broken-up root position, first inversion, second inversion and root positions rising, and reverses the order of the notes and chords to come back down. This is the broken chord pattern used in the module performance.
Notice the fingering. This is the ‘official’ fingering for inversions – fingers 1, 3, 5 for the root position and second inversion, and 1, 2, 5 for the first inversion. This is how the inversions best fit the hand – you should try to adopt it as your standard fingering. The temptation is never to use the second finger.
The next illustration shows the broken chord pattern shown as triads with the BMT mark-up.

Make sure you understand the pattern, then play it on all five Canon chords, starting on the root position triads you used for the inversion drill.
Here is a teaching video covering this part of the module.
Here are the component inversion drills for the five Canon chords
D major broken chord drill
B minor broken chord drill
A major broken chord drill
G major broken chord drill
F# minor broken chord drill
The module Canon broken chord study
You've been promised that broken chord study patterns are already ‘practically music’. The module Canon performance is the proof!
Here is the teaching video for this section of the module.
The right hand climbs up the inversions in D (first of a pair of chords), then slides down the inversions in A (second chord of the pair) from the note arrived at.
The music for the first pair of chord (D – A) is written out, but only the pattern is shown in the second line, which indicates how to ‘think’ the formula for the music.
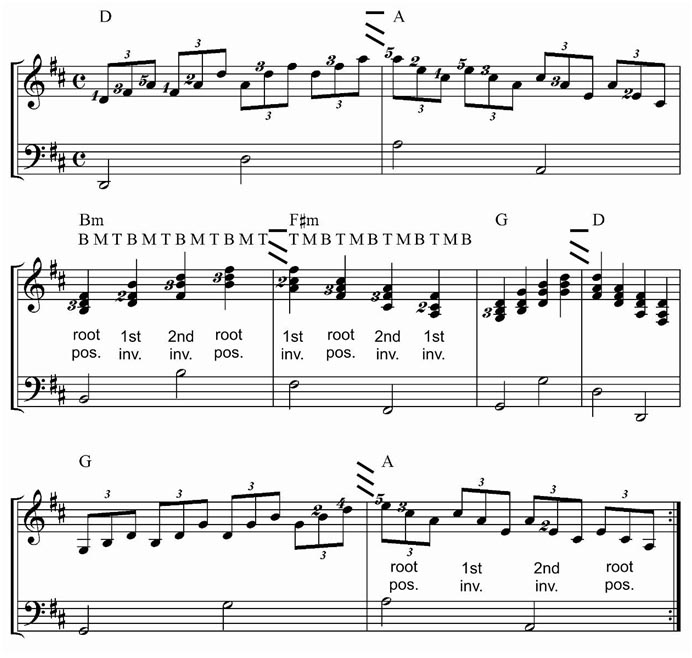
Note the voice movement diagrams at the middle of the pairs, where the chord changes. The top ‘voice’ (note) stays the same, the bottom two drop. You need to know your D major scale to know which notes they drop to.
Note the fingering. Try at least to remember to use finger 2 in the first inversion chord. You have to deviate from standard fingering to make changing chord easier.
The left hand in the audio performance plays a ‘bouncing bass’. You don’t have to play exactly as written – any roots will do.
More Canon broken chord studies
You should be able to copy these broken chord studies.
The first study is practically the same as the module sample texture, but with a rocky bass rhythm and a proper ending.
The unbroken triads are shown on the top keyboard. You should 'think' these - because they're simpler - but play the broken chord texture.
Broken Chord Study 1
This version dips down one inversion lower for the second chorus, bringing different fingering challenges.
Broken Chord Study 2
Audio challenge
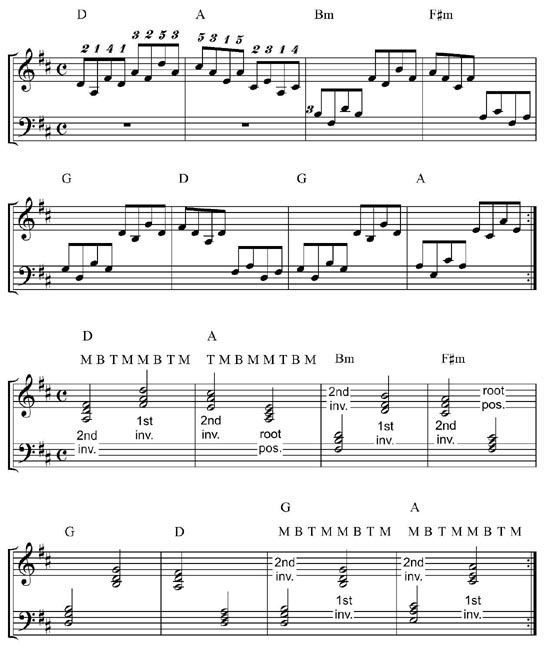
Here is another Canon broken chord study. Try to get the pattern and copy the performance.
The pattern doesn't always move to the nearest chord tone – it sometimes skips over to the next chord tone but one.
The two-bar pattern repeats - you only have to ‘get’ the first pair to fill up three quarters of the chorus. As usual, the last pair (chords G and A) is slightly different - it uses the rising (first) half of the pattern for both chords.
Here is the written-out music, with some notes.
|
OUT NOW! |
THE MUSICARTA BEAT & RHYTHM WORKBOOK At last! An effective approach to keyboard rhythm & syncopation skills. Learn more! |
ONLY $24.95! |
THE MUSICARTA
|
The MusicartaA methodical approach to keyboard syncopation for
|
PUBLICATIONS
exciting keyboard
creativity courses
CHORDS 101
WORKBOOK

~HANON~
video course

Musicarta
Patreon
PENTATONICS
WORKBOOK
video course

Creative Keyboard
video course

BEAT AND RHYTHM
WORKBOOK
- Volume 1 -

12-BAR PIANO
STYLES WORKBOOK
MUSICARTA MODES
WORKBOOK
PIANO STYLE
CANON PROJECT
video course

VARIATIONS
video course
- Piano Solo -
video course

- Piano Solo -


YouTube playlists


 THE LOGO
