Musicarta Twelve-bar Piano Styles
Moving Pair - Module Six
Inverting the Moving Pair
In the previous module, we split the notes of the Moving Pair riff two left and two right (‘two-plus-two format’). In this module, we’re going to discover yet more of the riff’s potential by ‘inverting’ the notes of the moving pair, slowing the tempo down and adding some crushed notes to get a bluesy, gospel feel.
Here’s the Module Six version of the Moving Pair riff.
Find the notes
Inverting means turning something upside down, or reversing it. In music, it generally means taking the top note of a chord or pair of notes down an octave, or the bottom note up an octave. In our particular case, we are inverting the ‘moving pair’ of notes downwards – taking the top note down an octave to become the bottom note.
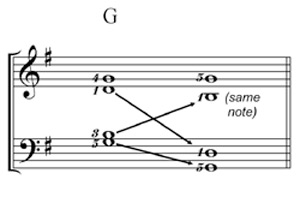
We move the bottom root down an octave too, so the moving pair stays inside a stay-the-same pair of roots. The four notes are still split two left, two right, but the moving pair notes ‘swap hands’.
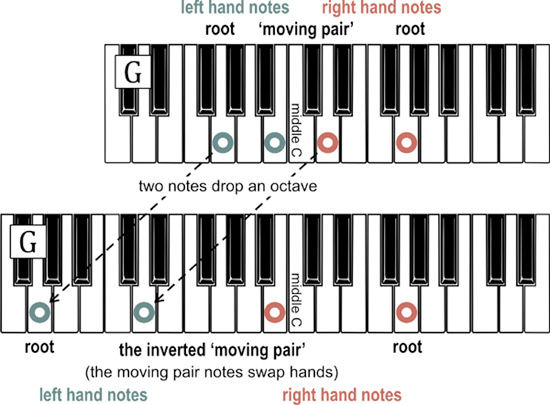
See where the chord tones have gone.
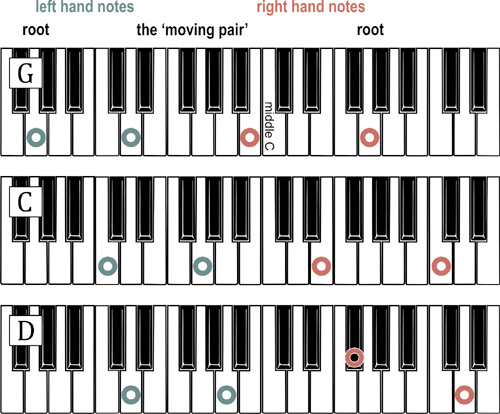
Here are the three (G, C and D) starting chords.
Move the pair
Next, ‘move the pair’. The inside notes move and the outside notes stay the same.
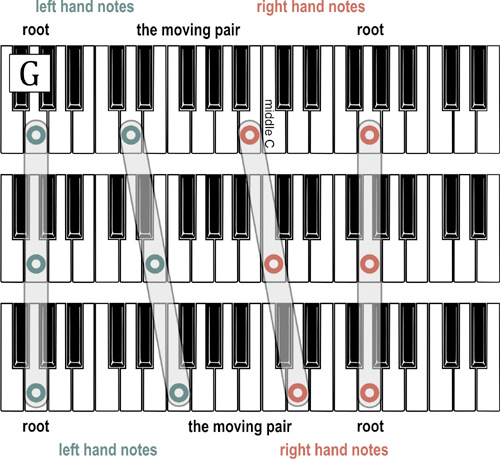
You only have a sample G position illustration (above) – you should be able to work out what happens in the C and D positions yourself. It’s the previous ‘moving pair’ of notes, but inverted – upside down. Remember that both the C and D moving pairs involve one black key.
Work from the audio performance clip – use the MidiPiano performance as back-up.
Fingering the new riff
To move forward, you have to set up the fingering. Play the previous exercise again with the fingering shown below.
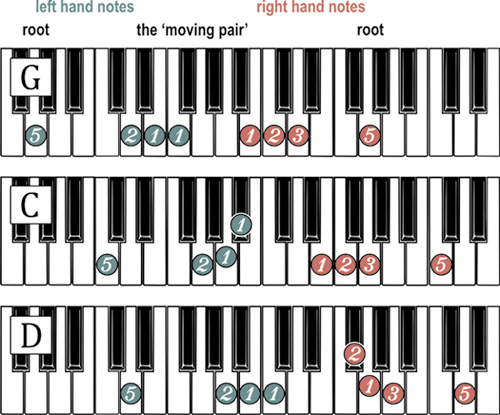
This is ‘best practice’ fingering. You could compromise a little and use more thumbs in the right hand, but this right hand fingering you up for good things later.
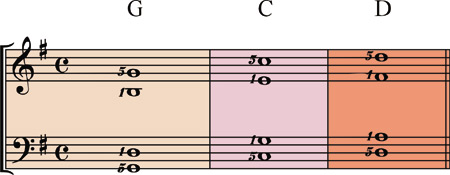
The moving pair written out
Here’s the moving pair written out with the proper fingering in the three positions.
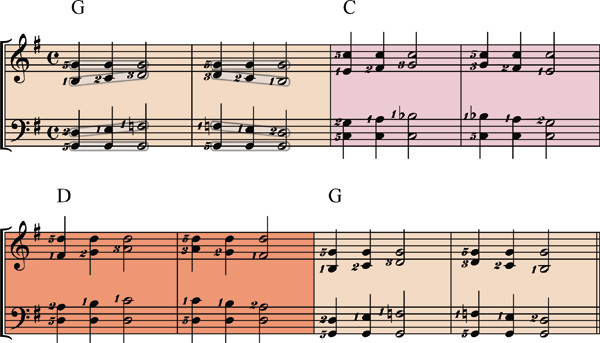
This is the last audio clip above, written out, with a G pattern added on to finish off musically. You can see the moving pair rising and falling inside the two roots.
‘Work’ the new material – imitate the Practice Drill in Module Five. It could easily turn into an original riff if you play around with it, tap your foot, and listen out for your Inner Blues Musician’s ideas on the material!
Adding the rhythm
Now listen this audio clip. A rhythm has been applied to the G chord moving pair.
Study the rhythm on its own.

‘Say along’ with the audio clip – saying it is half way to playing it.
Practice the chords in this rhythm in all three positions.
Now split the first right hand pair of notes and play the thumb first.
Now your beat map has different right and left hands. Only the right hand has changed.

It a good idea to practise your rhythms away from the keyboard. Try to tap your foot as well. Follow this beat map audio.
Rhythmic patterning is a large part of popular keyboard style, and if you get into the habit of thinking about it and practising methodically, you will make speedy progress.
Crushed notes
What gives the module riff its real bluesy feel is the ‘crushed note’ in the right hand.
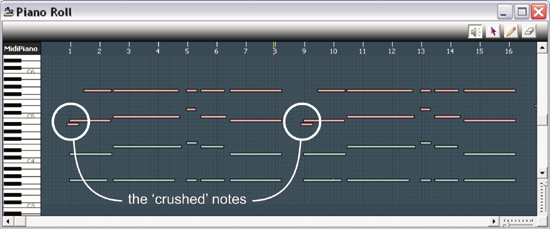
The first right hand thumb note of every pattern has a short extra note crushed up against it. It’s the note a semitone below.
Study the MidiPiano Piano Roll view of the crushed note.
There are two ways to play the crushed note. In G and C, the crushed note is a black key note, so you can easily play that key with the thumb and pull the thumb off onto the main white-key note. Otherwise, you use a different finger – RH2 for the G and C positions and RH1 for D.
Here is a video clip showing both techniques in G and C.
The crushed note is omitted in the D pattern.
Listen for more crushed notes in the module riff, and in 12-bar keyboard playing generally. Note that it takes a long time to develop a reliable, finely judged crushed note technique – just work at it!
Filling up the chord sequence
The inverted moving pair pattern is two bars long.
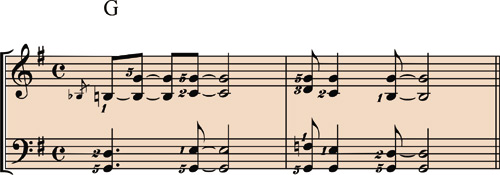
(Note, for interest, how the crushed note is shown in written-out music.)
Here’s our original, simplest 12-bar chord sequence.

Where you have two bars of the same chord, the two-bar patterns will fit nicely.

But bars 9 and 10 are one chord apiece, so we can’t use our pattern as it is, because it’s two bars long. The Module Six ‘solution’ is to use the rising half of the pattern in D and the falling half in C, using the rhythm of the second half of our pattern both times.
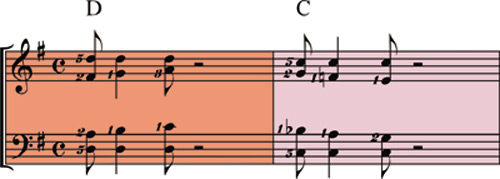
The audio demonstrates the D and C patterns without crushed notes, but you can put in as many as you like, either sliding off the black key or using the next-door finger.
As you can hear, putting crushed notes everywhere you can is ‘too much’. Listen closely to the Module riff again to hear the Musicarta suggestion.
An alternative chord sequence
An alternative to having half patterns in bars 9 and 10 would be to use this chord sequence:

Try it – it will help you recognise chord sequences.
Module summary
Here's the module tutorial video.
This is the end of the main ‘Moving Pair Riff’ learning material, which has introduced the basics of all piano 12-bar blues and boogie styles. The rest of the series invites you to discover how much you’ve learned, as you start to play some other classic blues and boogie keyboard riffs based on the Moving Pair material.
|
OUT NOW! |
THE MUSICARTA BEAT & RHYTHM WORKBOOK At last! An effective approach to keyboard rhythm & syncopation skills. Learn more! |
ONLY $24.95! |
TWELVE-BAR |
The MusicartaA methodical approach to keyboard syncopation for
|
PUBLICATIONS
exciting keyboard
creativity courses
CHORDS 101
WORKBOOK

~HANON~
video course

Musicarta
Patreon
PENTATONICS
WORKBOOK
video course

Creative Keyboard
video course

BEAT AND RHYTHM
WORKBOOK
- Volume 1 -

12-BAR PIANO
STYLES WORKBOOK
MUSICARTA MODES
WORKBOOK
PIANO STYLE
CANON PROJECT
video course
VARIATIONS
video course
- Piano Solo -
video course

- Piano Solo -


YouTube playlists


 THE LOGO
